Monday 26 February 2024

Creative Scrapbooker Magazine - Spring 2024 Issue

 Hello, my friends!

After taking a bit of a break from submitting,
I'm thrilled to have some projects in the most recent issue of 
Creative Scrapbooker Magazine!


First, I have very generously been given a full page for my Steampunk Envelope Album. 
I made this for Kate Crafts, and you can see the post HERE.


I also have two other cards in this issue, also created for Kate Crafts.
You can see that post HERE.


* * * * *

As always, the Spring 2024 Issue is FULL of fabulous projects 
and beautiful inspiration! 
You can find one on your local stands! :o)


Monday 1 January 2024

Mini Album Mania - January Challenge

 Happy New Year, my friends!

Welcome to my first post of 2024!
Can you believe we're beginning another year already?
Where does the time go? ;o)


It's time for a new Challenge at Mini Album Mania Challenge!

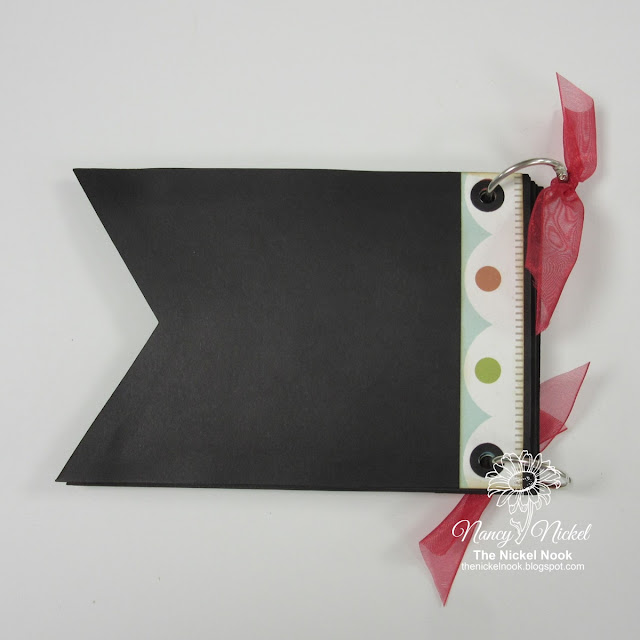
Here's my mini album for this month:


I used a Sizzix pennant die for my base.
It measures 4 1/2" x 6".
I cut 10 pennants from black cardstock.


I used an old Echo Park Collection for all the backgrounds and bits.


Each spread has belly bands and tuck spots.


The collection included lots of fun journal cards.
Most of the backgrounds are open to add photos.


I used a lot of the cute stickers from the collection as well.


For my binding, I used two rings.
I added black cardstock reinforcements to each of the holes.

Finally, I tied a pretty piece of ribbon to each ring.
Here's the back cover.


Materials Used:
Sizzix Pennant Die;
Echo Park Paper Collection;
Black Cardstock;
Walnut Stain Distress Ink;
Binder Rings;
Offray Ribbon.
 

* * *

Mini Albums are so much fun to make!

Head over to the Mini Album Mania Challenge Blog
to get all the rules and details,
and join in the fun!

I can't wait to see what you make!

* * *

Sunday 24 December 2023

Merry Christmas and Peace on Earth for Emerald Creek Craft Supplies

Merry Christmas, my friends!

This is my last project this year, and it's for Emerald Creek Craft Supplies
The message is perfect, and something we should all be praying for!
 

Here's my card:


As with my last "stained glass" card,
I began by heat embossing the image with black embossing powder.
I then coloured the image in with the wonderful Kaleidoscope Watercolours.


I fussy cut around the image, 
and then added Stickles to the star, and around the head of baby Jesus.

I then layered the image up, beginning with the Starstruck Rinea Foiled Paper.
I thought the little stars in the background worked beautifully with the image.
It also adds some lovely shimmer and shine.
Then a skinny layer of red, before mounting everything on a black card base.


It's a beautiful stamp design, with so many design options!

* * *

Emerald Creek Craft Supplies Used:

 Peace Large Cling Mount Stamp;

Quietfire Goth Black Modern Gilding Powder;

Kaleidoscope Watercolours:

Crushed Grapes;

Pomegranate Seeds,

Kananaskis Slate,

Swept Mustard.

Other Materials Used:
Mixed Media Paper;
DCWV Cardstock;
Rinea Starstruck Gold Foiled Paper;
Diamond Stickles.

* * *

Thank you for stopping by today!
I would like to wish you all the Merriest Christmas!

I pray that your 2024 will be filled with PEACE and JOY!

* * *

Here are all the links for you:

Emerald Creek Craft Supplies

Emerald Creek Facebook

Emerald Creek Instagram 

Thursday 21 December 2023

Pumpkin Season Tag for Emerald Creek Craft Supplies

Hello, my friends!

I'm back with another fun project for Emerald Creek Craft Supplies

There are only a few hours left in our Fall season,
so I thought I better hurry and share this one now.

It's really hard to believe that Winter begins later today here in Saskatchewan.
Our weather, and view out the window, are definitely more Fall then Winter!

Here's my tag:


My tag base is cut from matboard, and covered with a decorative paper.
The fence image was stamped onto the background.
The edges are all inked, and a piece of ribbon was threaded through the top.

The leaves and pumpkins were stamped with embossing ink,
and then heat embossed with the Gothic Black Gilding Powder.
The images were then coloured with the fabulous Kaleidoscope Watercolours.
I LOVE these watercolours! They are so rich and creamy!

I only had red, blue and yellow (links below),
so I had lots of fun mixing the colours into green and orange.
Once the images were dry, I adhered them in place with foam tape.


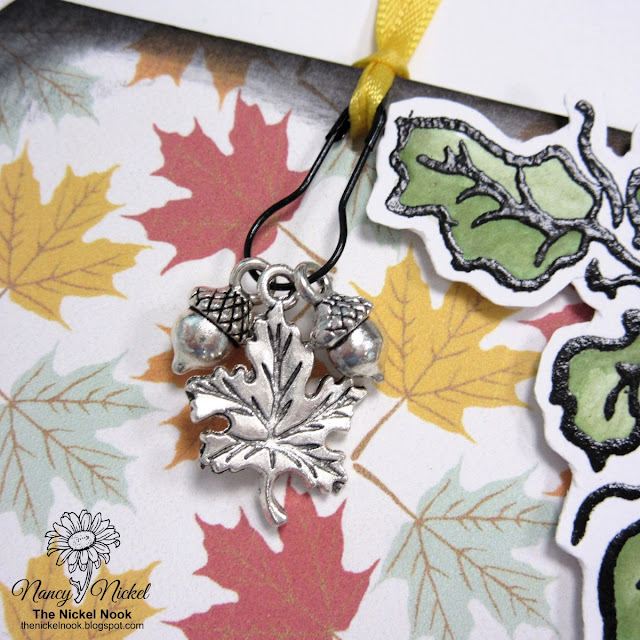
Finally, I added some adorable charms to a bulb pin,
and threaded it through the ribbon.


Emerald Creek Craft Supplies Used:

Powders:

Gothic Black Gilding Powder by Quietfire

Stamps:

Leaf Corner Cling Mount Stamp;

Not Wired Cling Mount Stamp;

Pumpkin Patch Cling Mount Stamp.

Kaleidoscope Watercolours:

Pomegranate Seeds;

Swept Mustard

Kananaskis Slate.

Charms:

Mini Acorn Charm;

Other Materials Used:
Matboard Tag Base;
Recollections Paper;
Offray Ribbon;
Black Soot Distress Ink;
Bulb Pin.

* * *

Thanks for stopping by today!
I'll be back with another new project soon!

Emerald Creek Craft Supplies has such a great variety of fun products!
Head on over to the shop and check it out!

* * *

Here are all the links for you:

Emerald Creek Craft Supplies

Emerald Creek Facebook

Emerald Creek Instagram

Friday 15 December 2023

Unique Art Expressions December Challenge - Christmas

   Hello, my friends!

It's time for a new Challenge over at Unique Art Expressions.
This is a fun, monthly challenge blog.
Each challenge begins on the 15th of the month, and runs until the 12th of the following month.
The twist of this challenge is that you can make and enter anything BUT a card!
No cards allowed! :o)

* * *

This month our Challenge is

December Challenge: Christmas

This month we are Sponsored by:

 Jubilant Studio


Here's my project:


I've made another TN spread using the sheet of images from the sponsor.
The page is FULL of fun and festive designs!

As usual, I printed and fussy cut the images.
Then I just put it all together on my background page!

To finish the page off, I added Stardust Stickles to all the snowflakes and lights on the tree!


 Products Used:


Other Materials Used:
Traveler's Notebook;
Stardust Stickles.
 

* * *
Please join us over at the

Unique Art Expressions December Challenge!

Make a NOT A CARD project and link it up.
I look forward to seeing what you create!

Here are some ideas:
ATCs,
Art Journal Pages, 
Traveler's Notebook Pages;
Mixed Media Designs;
a Canvas;
Mini Albums;
Tags.
  

Thursday 14 December 2023

Christmas Cards for Polka Art Studio

    Hello, my friends! 

Today I have another fun project for Polka Art Studio!

I have made a collection of Christmas cards,
using only two collections from the shop:

 Beige Bliss Decorative Papers Collection,

and Beige Bliss Fussy Cuts Collection.

The joy of using digital printable collections is that you can get started immediately!
So you still have lots of time to get some projects finished!
Also, the joy of using these particular collections - they're GORGEOUS!
Plus...there are so many more images for me to use.

Before we get started, I'll give you a little rundown of what I did.
I first printed out the images that I wanted to use, and fussy cut them out.
I then printed out the papers, and decided which image which go with which paper.
Then it was just a matter of choosing some coordinating cardstock,
along with some suitable dies.
I inked all the edges, and adhered everything in place.
Finally, I added some sequins, stickles, twine/ribbon, or buttons;
whatever worked best!

Here we go:


It's a beautiful collection to play with!

As you can see...I made a variety of projects...from elegant to vintage!
I even included a small gift bag and pillow box.
The possibilities are endless!

* * *

Polka Art Products Used:

 Beige Bliss Decorative Papers Collection,

 
Other Materials Used:
Recollections Cardstock;
Sequins;
Diamond Stickles;
Ribbons - Offray, Celebrate It!;
Wood Buttons;
Jute Twine:
Assorted Dies - Spellbinders, Tim Holtz.

* * *

Thank you for stopping by today!
I'll be back soon with another fun project!

* * *
There are lots more fun goodies in the Polka Art Studio Shop!
Make sure you sign up for the newsletter too!
You don't want to miss all the fun events and freebies!

Polka Art Studio Links:

Polka Art Studio Etsy


Polka Art Studio Instagram 

Tuesday 12 December 2023

Fall Scene Mixed Media Canvas for Emerald Creek Craft Supplies

 Hello, my friends!

I'm back to share another Emerald Creek DT project with you today!

I had so much fun putting this together, using great products from the shop!

Here's what I made:


Here's how I did it:


I've had both this 6 x 6 canvas, and the leaf patterned tissue paper,
in my stash for years. It was time to use them in a project. 
I began by tearing pieces of the tissue paper...with no rhyme or reason.
I then used a paintbrush and matte medium to adhere them to the canvas.
I made sure to wrap the sides with tissue as well.

I then found a piece of plain kraft colored tissue.
It didn't quite match the leaf pattern tissue - but it didn't matter.
I then gathered up my Emerald Creek stamps (links below).
Using Jet Black Archival Ink, I stamped the images onto the tissue.
I did several of each while I was at it.


I then tore around the images, 
and adhered them in place using the matte medium.
During this process it's easy to get wrinkles in the surface.
I took out any that interfered with the image, but I left the others in.
It adds some really nice texture.


Once everything was dry, I coated it with a layer of embossing ink.
I then sprinkled it liberally with the Clear Fine Gloss Embossing Powder.
Then I hit it with my heat gun, until it was all evenly melted.

Here's the first coat:


I repeated this process two more times.
Here's a look at the canvas after three coats of the clear.
Isn't that a beautiful shine?


Before the last coat was completely set, I sprinkled some of the
Caramel Rock Candy by Pam Bray in the areas that I wanted it,
and again hit it with my heat gun.
This was my first time using this product.
I was hoping it would look like the rocky, gravely areas
that we often see at abandoned farm yards.
It's a great product, and very easy to use. 
I just kept sprinkling it on until it looked the way I wanted it to. 


Finally, when everything was set and cooled, I added a couple of embellishments.
I tied some jute knots to a metal band, and adhered it in place.
Then I did the same with an adorable Squirrel Charm from the shop.


Here's a closer look:


Doesn't that Rock Candy add some fabulous texture?


This was such a fun combination of products to play with!
Now I have a lovely Fall Scene Canvas to decorate my home for the season!


Emerald Creek Supplies Used:

Stamps:


Powders:


Charm:


Other materials used:
6 x 6 Deco Canvas;
Tissue Paper - Leaf Patter, Kraft;
Matte Medium;
Jet Black Archival Ink;
Stampendous Embossing Ink;
Distress Ink - Black Soot, Walnut Stain;
Tim Holtz Metal Word Band;
Natural Jute.

* * *

Thanks for stopping by today!
I'll be back with another fun project soon!

Emerald Creek Craft Supplies has such a great variety of fun products!
Head on over to the shop and check it out!

* * *

Here are all the links for you:

Emerald Creek Craft Supplies

Emerald Creek Facebook

Emerald Creek Instagram

Blog Archive